Archive

Archive for February, 2011

One Server: Researching the hardware

February 16th, 2011 2 comments

Using my list of requirements, I set out to find the hardware for my new server.  I was building this from scratch so at minimum my purchase list needed to include

  1. hard drive storage
  2. server case
  3. motherboard, RAM & CPU

Hard drive storage
I decided to focus first on the requirements for the fileserver side of the project.  Recall that I was planning for 16TB of storage space.  At the time, the largest consumer hard drives were 2 TB.  I also wanted to be able to support multiple drive failures and be able to replace the drives without shutting down the system.  That meant I needed at least 10 hard drives.

When researching the hardware for this server I came across a good blog post from Adaptec about real life RAID reliability.  That article compared the reliability of  RAID-5 and RAID-6 arrays and showed that a RAID-6 array should last 172 times longer than a RAID-5 array.  Reliability was important to me on this project, so I decided to go with RAID-6.  The Adaptec article only considered enterprise grade drives. I planned to build this server with consumer grade drives.  Therefore, as a precaution, I chose to add two extra drives as hot spares.

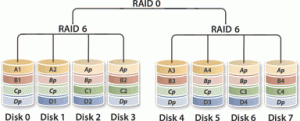
A RAID-6 array with 10 drives was likely to run slow.  So I did some more searching and came across RAID-60.  RAID-60 combines the redundancy of RAID-6 with the speed of striping found in RAID-0.  However, to get 16 TB with RAID-60, and have two hot spares, I now needed 14 hard drives.  Six drives for each of the two RAID-6 arrays and two hot spares.

RAID-60 with 8 drives. Image from Wikipedia

I wanted to make sure the fileserver would run quickly so that I could stream video from it while MythTV was also recording new programs and all the virtual machines were also running.  I thought running everything off one set of storage drives might be too much, so I decided to split the VM storage from the NAS storage.  That meant adding additional drives.  I had four 1TB drives from my previous NAS, so I decided to use them for storing the VM images.

That put the total number of hard drives needed at 18.  This was shaping up to be quite a storage server!  The next task was determining how to fit that many hard drives into a computer case.

Server Case
I wanted the server to be able to stay running while I replaced a failed drive, so I needed a case that accommodated hot swappable drive bays.  I considered putting the drives into some six-bay external drive enclosures, but decided that would get too expensive and end up using more power then was needed.  Plus, I could just see the cables getting disconnected between the external enclosures and the main CPU.

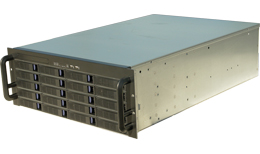
No tower-style case that I could find would hold that many drives, so I looked for rack mountable cases.   To fit 18 drives, a 4U rack mount case was needed.

Motherboard, RAM & CPU
I wanted to be able to expand this system in the future, so when choosing the motherboard I focused on server boards that supported dual CPUs.  My plan was to put the system together with one CPU, and if needed, add another CPU later.  I also needed to find a motherboard with multiple network interfaces, and plenty of PCI-express slots for adding RAID cards.  Since reliability was important to me, I focused only on motherboards that supported ECC RAM.  Form factor wasn’t a big issue for this system as it was being placed into a rack mount case with plenty of space.

For the CPU, I needed a processor that supported VT-d.  VT-d processors support mapping cards plugged into PCIe slots directly into virtual machines.  My goal was to create a virtual machine for the fileserver and map the RAID card directly into that VM.

Another goal of mine was to make the new server easy to administer.  I didn’t want to have to find a spare keyboard, mouse, and monitor and plug them all in when there was trouble.  The solution, IPMI.  A motherboard with IPMI would allow me to remotely control the keyboard, mouse, video and even attach a remote DVD-ROM to perform an OS install.  It is basically a built-in KVM over IP.  I can even remotely reset the computer using IPMI.

Parts list
I ended up purchasing the following components for this system

  • 14 x 2 TB hard drives (5 x Hitachi HDS72202, 3 x SAMSUNG HD203WI, 6 x WDC WD20EADS)
  • Norco RPC-4220 4U rackmount case with 20 hot swappable drive bays
  • Supermicro X8DTi-F motherboard with 3 PCIe 8x slots and IPMI
  • 24Gb ECC Registered DDR3 1066 RAM
  • Intel Xeon E5506 Nehalem-EP 2.14 GHz processor
Categories: Uncategorized Tags:

A home server using VMware ESX and ZFS

February 16th, 2011 10 comments

Server CaseIf you are like me, and you like technology, you probably find yourself wanting to try the latest operating systems and software.  You also likely have a router for your network, a NAS device for your storage, and maybe a web server for a blog or wiki.  After a while, you end up with the situation shown in the picture below, a closet full of servers.
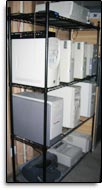
The picture below is of my server closet from 2004.  I had a custom Linux router, a NAS box, a VoIP server, and several other computers for trying out operating systems and software.

Old Server ClosetMy setup continued that way for several years.  It took up a lot of space.  It was loud.  It was hard to upgrade because I needed to physically sit at the computer to reload the operating system.  And it used a lot of power.

In 2007 I started to use virtualization to cut down the number of computers and make controlling and upgrading them easier.  I was able to get the number of computers down to only two: A NAS for storage, and a Linux computer for running VirtualBox.  Everything else I needed could run in a VirtualBox guest.

This worked well until 2009 when I started to run out of storage on my 3 terabyte NAS server.  As I was planning to replace it, I decided to try combining the two servers into one.  I wanted a server that would have plenty of disk space for my NAS and be able to run any operating system and software that I wanted to try out.

I called this my One Server project.  The next several posts will cover this project.  These posts describe the hardware behind the server, using VMware ESXi to replace my aging Linux VirtualBox server, setting up a FreeBSD ZFS NAS fileserver under VMware ESXi, and all the issues and solutions I discovered along the way.

  1. One Server: What is needed?
  2. One Server: Researching the hardware
Categories: Uncategorized Tags:

One Server: What is needed?

February 16th, 2011 4 comments

To make sure I got the right hardware and software for this server I needed to know what the server was going to be used for.  I needed to get an idea of how much computing power I was going to use to run all the virtual machines.  And since this project started off as an upgrade to my NAS fileserver I also needed to figure out how much storage space I was going to need.

I knew from my previous VirtualBox server what guest operating systems I was going to run.  They were:

  • Astaro Security Gateway for the firewall/router
  • Windows 7 for a “standalone” computer used only for banking
  • Linux for a web server
  • Linux for a CrashPlan backup server
  • Linux for a OpenVPN server

My previous fileserver had four disks in a RAID-5 setup for a total of three terabytes.  It was very slow and I wanted to find a way to speed it up.  At the same time I needed to add enough disk space so that I wouldn’t have to think about disk space for a long time.  I previously used the file server for:

  • storing backup copies of my iTunes music and video libraries
  • keeping copies of operating system ISO install images for installing VMs
  • backing up my wife’s and my own laptop as well as my web server
  • storing an ever growing 500Gb RAW photos library from my DSLR camera
  • storing video for my MythTV setup

I had also recently gotten a new camera capable of recording HD video.  HD video files take up a lot of space and with a new baby daughter I was recording a lot of video.

Doing the math, I decided I needed at least 8 terabytes of storage to comfortably cover my needs.  To make sure I wouldn’t have to worry about storage space again, and considering Moore’s law, I decided to double that and plan for 16 TB of storage space.

I had the following additional requirements of the server itself

  1. be reliable enough to run 24×7 for several years
  2. continue working without data loss if two hard drives fail
  3. allow for hard drives to be replaced without shutting down the system
  4. be easy to backup
  5. report any errors with the drives or the virtual machines so they can be fixed quickly
  6. be compatible with as many guest operating systems as possible
  7. be easy to install, maintain, and configure.  Well, easy for a technical person at least
  8. allow for remote maintenance of the host operating system
  9. have room for expansion (cpu/ram/disk/etc upgrades)
  10. be quiet
  11. not use too much electricity
  12. support multiple network interfaces. It is going to be my router and needs to plug into my cable/dsl modem as well as my LAN

The reliability of the server was my most important factor.  Since I was consolidating everything on this one server, if it ever went down nothing would work.  It was also going to store all our family photos and videos.  I planned to keep everything backed up, but I wanted to make sure I wasn’t going to lose those memories due to a failed disk or silent bit rot.

Categories: Uncategorized Tags:

IntenseDebate and Google Analytics

February 16th, 2011 22 comments

I use IntenseDebate for the comment system on my blog. I also use Google Analytics to keep stats on how many people visit my site. To integrate the two, I created a Google Analytics plugin for IntenseDebate.  With this plugin, when someone leaves a comment, an event is added in Google Analytics.  This event can then be used with advanced segments in Google Analytics to see metrics focusing just on visits that lead to comments.

To see the IntenseDebate events in Google Analytics, browse to Content -> Event Tracking -> Categories ->IntenseDebate

The plugin is not currently in the approved list of IntenseDebate plugins.  I’d like to do more testing before submitting it.  If you’d like to help test, you can download my IntenseDebate Google Analytics plugin and add it to your IntenseDebate custom scripts.

The plugin can be customized to create a virtual page view if you’d like to create a goal based on comments.  To enable this, add the following to your IntenseDebate custom scripts.

var id_ganalytics_plugin = id_ganalytics_plugin || {};
id_ganalytics_plugin.use_vpage = true;

With this enabled, a page view for /service/IntenseDebate/CommentPosted will be created each time a comment is posted.

The plugin can further be customized to change the event that is tracked and to change the virtual page.  The following options control the event.  See the event tracking overview page for documentation on category, action, and label.

var id_ganalytics_plugin = id_ganalytics_plugin || {};
// Use id_ganalytics_plugin.use_event to enable/disable event based tracking
id_ganalytics_plugin.use_event = true;
 
// Use id_ganalytics_plugin.event_category to set the event category
id_ganalytics_plugin.event_category = 'IntenseDebate';
 
// Use id_ganalytics_plugin.event_action to set the event action
id_ganalytics_plugin.event_action = 'Comment Posted';
 
// Use id_ganalytics_plugin.event_label to set the event label
id_ganalytics_plugin.event_label = location.href

The following two options control the virtual page views

var id_ganalytics_plugin = id_ganalytics_plugin || {};
 
// Use id_ganalytics_plugin.use_vpage to enable/disable virtual page tracking
 id_ganalytics_plugin.use_vpage = false;
 
// Use id_ganalytics_plugin.vpage to set the virtual page to be tracked
id_ganalytics_plugin.vpage = '/service/IntenseDebate/CommentPosted';

Leave me a comment if you find this useful, or if there is anything you’d like to see chaged.

Categories: Tutorial Tags: